This an edited extract from Fifty Ways to Fly Better, by Bruce Goldsmith and friends

What is rear-riser control? “Rear-riser control allows you to keep contact with the glider while gliding, especially when using the speedbar,” explains Ozone test pilot Russell Ogden.
“For exactly the same reason you use your brakes to keep contact with the glider at trim speed in turbulent air – to keep active control, pressure control, to feel the glider – you can use the rear risers to achieve the same thing while on glide.”
Although the technique has been used by many pilots for many years, it has only become more common practice in recent years. “I’ve taught it on SIV courses for 10 years,” says Russell.
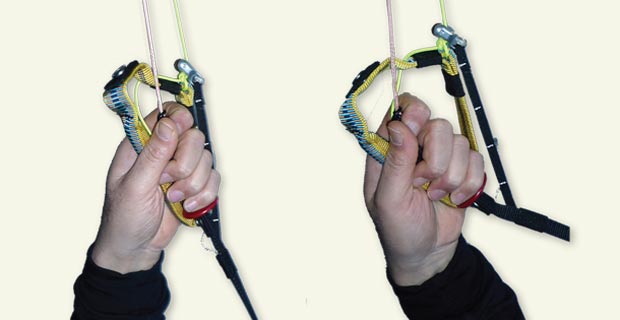
“I do it by keeping the brakes in my hand – but ensuring I’m not applying any brake – whilst taking hold of the rear risers near the maillon or in a position that is comfortable for me, normally somewhere lower.”
So what are the benefits, compared with using the brakes? “If you’re gliding somewhere, whether at full-speed, half-speed or trim-speed, using the rear risers helps you feel the back of the wing; to control the pitch and maintain the pressure in the nose,” he explains.
“If the air is turbulent, pulling a small amount of tension allows you to feel the pressure inside the wing and it also means that your hands are in a ready position to effect pitch control if necessary.
“If the nose suddenly loses pressure, a quick input on the rear risers can keep it open, it gives you a little bit more information than just working with your feet on the speedbar alone. If the air is smooth, of course you can just release all the pressure to allow the glider to fly normally.”
Rear-riser control gives you the maximum amount of information and the maximum control with the minimum amount of input, he adds.
“It also creates less drag than brakes and is more efficient than always coming completely off the bar and then accelerating again.” It’s useful in ‘mid-level’ turbulence. “If the air starts to get really rough then of course I come off the speedbar and use the brakes as normal.
“The technique is especially useful for high performance wings in competitions when maximising efficiency is the main aim, but it is also applicable to XC and everyday flying on recreation gliders. I use it all the time.”
Wing-watching
Russell admits to being “a closet wing-watcher”. “I look at my wing a lot, especially if I’m gliding at speed because my priority is the leading edge and keeping it inflated,” he says. “So I use a combination of the pressure through the speedbar on my foot, my eyes on the leading edge, and the feel through the rear risers. That way I have as much information as it is possible to gather.”
If you start to see and feel the leading edge collapse, you can do a combination of coming off the bar (slightly, not all the way) and pulling the rear riser (as much as necessary) to keep the wing inflated, Russell explains.
“The input is not like a brake input, it’s a smaller, faster one – there is a risk of stalling if you are too heavy-handed. I find it gives you more feel, more control, and it gives you a quicker warning of any imminent collapse.”
To see more of what’s in the book see:
How to fly XC on an EN-A paraglider
Understanding pitch on a paraglider


